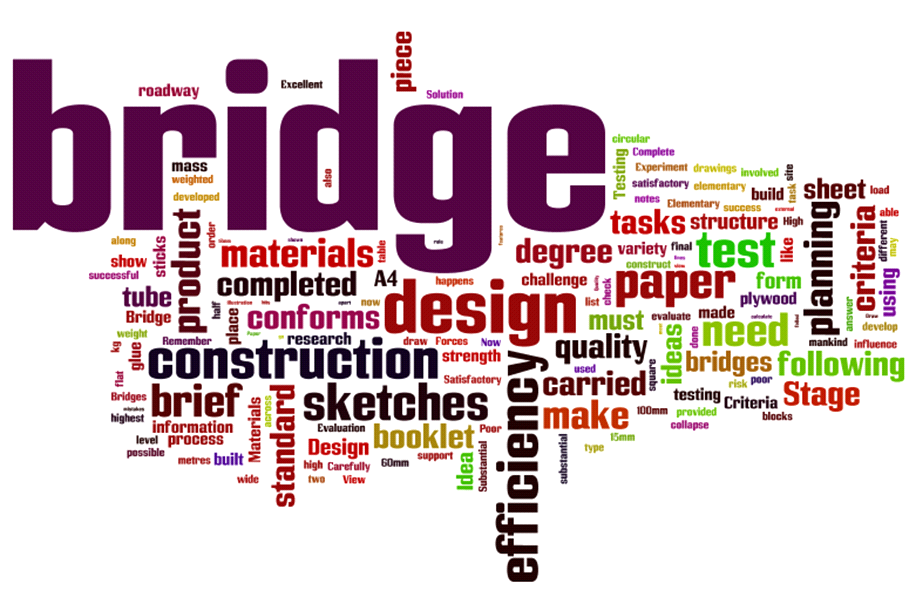
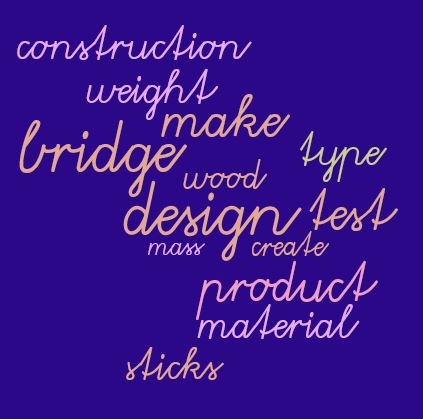
Activity 1: WORDLE
Create your own wordle for bridge building at www.wordle.net
Save a copy and paste it below. Example below (no you cant just copy and paste)
Save a copy and paste it below. Example below (no you cant just copy and paste)
Activity 2: Glossary
Bridge: a structure carrying a road, path, railway, etc. across a river, road, or other obstacle
Design: plan or drawing produced to show the look and function or workings of a building, garment, or other object before it is made
Construction: the action of building something, typically a large structure.
Testing: take measures to check the quality, performance, or reliability of (something), especially before putting it into widespread use or practice.
Materials: the matter from which a thing is or can be made.
Strength: the capacity of an object or substance to withstand great force or pressure.
Constraints: a limitation or restriction.
Force: strength or energy as an attribute of physical action or movement.
Tension: the state of being stretched tight.
Compression: the reduction in volume (causing an increase in pressure) of the fuel mixture in an internal combustion engine before ignition.
Quality: the standard of something as measured against other things of a similar kind; the degree of excellence of something.
Sketches: make a rough drawing of.
Orthogonal: of or involving right angles; at right angles.
Activity 3: Safety Poster
Your Task:
To design and paste a one page safety poster for the Technology Room. Your poster needs to have a safety message relating to the Technology Rooms.
Your poster could be decorated with:
To design and paste a one page safety poster for the Technology Room. Your poster needs to have a safety message relating to the Technology Rooms.
Your poster could be decorated with:
- A border
- Written text
- A picture or graphic
- Different font sizes
- Word Art

Design Situation:
Bridges are built for a variety of reasons and in a variety of styles. They can be made of many different materials and have a variety of uses. Your task is to design a model bridge for a KHS bridge building competition.
Design Brief:
Working in pairs, you are to construct a bridge using materials as described below. Your bridge can be modelled on any built structure but must meet the following design constraints
Criteria for success:
1. Your bridge must span 550mm
2. The bridge roadway is to be not less than 60mm wide and the external width is to be not more than 140mm.
3. A vehicle of size 60mm wide x 50mm must be able to pass unobstructed across the bridge.
4. The depth of the bridge below the roadway is not to exceed 200mm.
2. The bridge roadway is to be not less than 60mm wide and the external width is to be not more than 140mm.
3. A vehicle of size 60mm wide x 50mm must be able to pass unobstructed across the bridge.
4. The depth of the bridge below the roadway is not to exceed 200mm.
Materials:
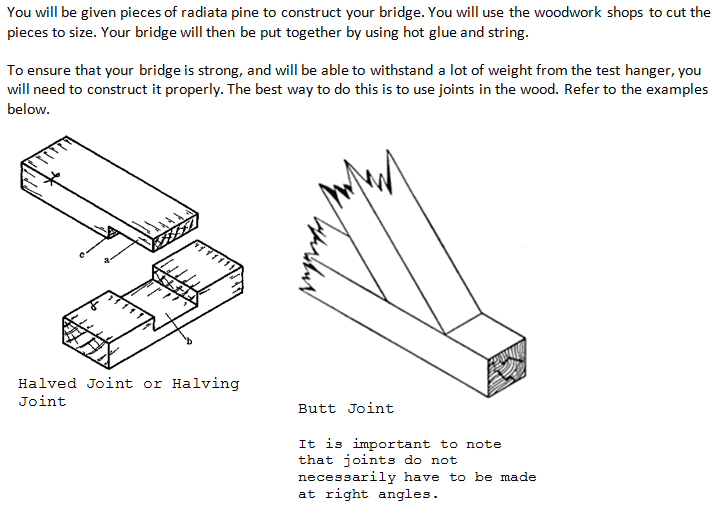
In order to construct your design, you will be limited to using no more than the following materials: . 10 lengths of 600 x 10 x 12mm radiata pine
. 10 sticks of hot glue
. 30 nails 15mm x 1.25mm
. 10 sticks of hot glue
. 30 nails 15mm x 1.25mm
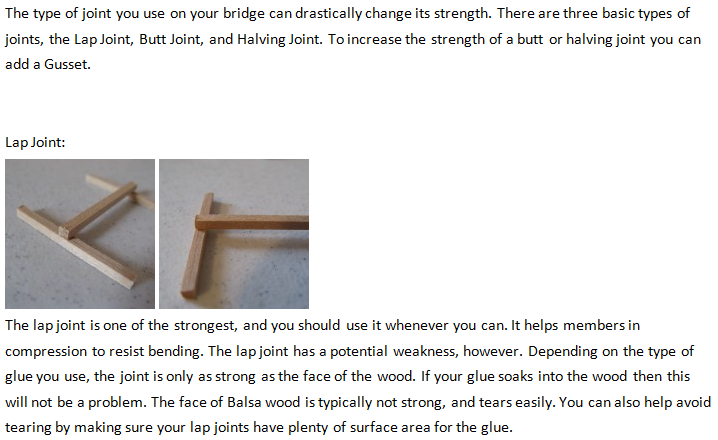
Forces: Tension and compression
You will need to research existing bridge designs and gather ideas that are within your capabilities. You will need to consider the forces of tension and compression that will be acting on the bridge and which will play a large role in the success of your bridge. Once you have done some research, you will develop sketches of your preliminary ideas.
What allows an arch bridge to span greater distances than a beam bridge, or a suspension bridge to stretch over a distance seven times that of an arch bridge? The answer lies in how each bridge type deals with the important forces of compression and tension.
Tension: What happens to a rope during a game of tug-of-war?
It undergoes tension from the two sweaty opposing teams pulling on it. This force also acts on bridge structures, resulting in tensional stress.
Compression: What happens when you push down on a spring and collapse it? you compress it, and by squishing it, you shorten its length. Compressional stress, therefore, is the opposite of tensional stress.
Compression and tension are present in all bridges, and as illustrated, they are both capable of damaging part of the bridge as varying load weights and other forces act on the structure. It's the job of the bridge design to handle these forces without buckling or snapping.
Buckling occurs when compression overcomes an object's ability to endure that force. Snapping is what happens when tension surpasses an object's ability to handle the lengthening force.
The best way to deal with these powerful forces is to either dissipate them or transfer them. With dissipation, the design allows the force to be spread out evenly over a greater area, so that no one spot bears the concentrated brunt of it. It's the difference in, say, eating one chocolate cupcake every day for a week and eating seven cupcakes in a single afternoon.
In transferring force, a design moves stress from an area of weakness to an area of strength. As we'll dig into on the upcoming pages, different bridges prefer to handle these stressors in different ways.
Go to the website:
http://www.perrinhall.com/projects/bridges/how_bridges_work.html
This will help you understand the forces of tension and compression on different types of bridges.
Activity 3: Tension and compression
Compression and Tension are the two primary forces acting upon your bridge. An easy way to think of compression and tension is the direction in the which the force is being applied.
Compression
Stand across from another person. Put your hands on each others shoulders, and lean in. You are experiencing compression.
Another way to look at it is if you sat on top of a table. The legs of the table would be under compression.
When wood is under compression, it tends to buckle. You generally want slightly denser wood for areas of compression, depending upon the amount of compressive force.
Tension
Stand across from another person. Hold hands and lean back. Your arms feel as if they are being stretched apart. This is tension.
Another way to think about it is if you had a pencil and you held it with both hands at opposite ends, and pulled at it from each side.
When wood is under tension, it tends to snap. You generally want a flexible piece of wood for areas of tension.
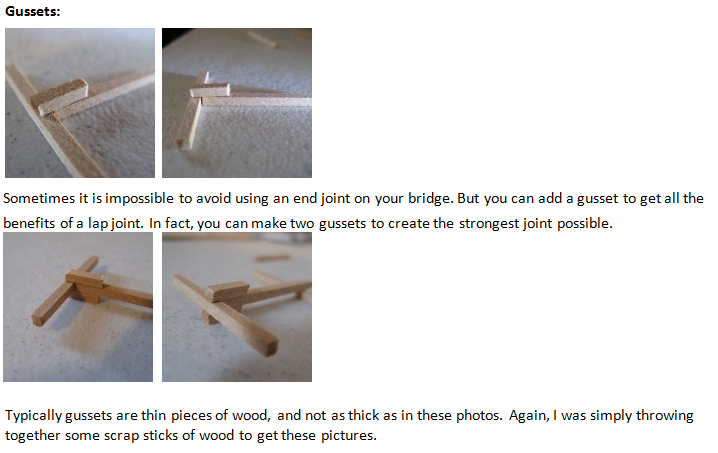
Constructing your bridge

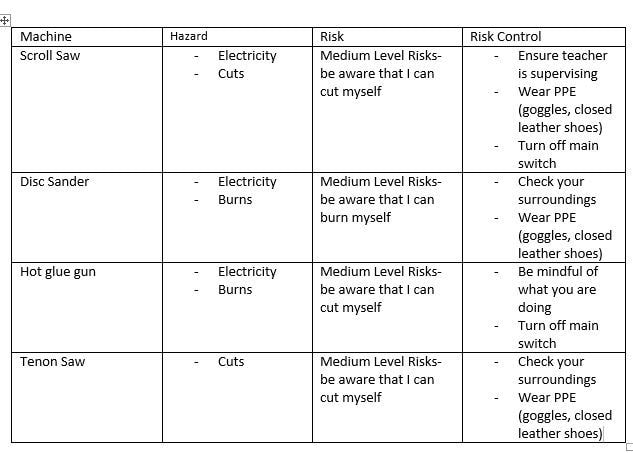
Activity 4: machine usage and safety
Define the following:
Hazard:
Risk:
The following table is a risk assessment of the possible machines you might need to use. Make a similar table on word, fill it out like the example shown and paste it into the space below.
Hazard:
Risk:
The following table is a risk assessment of the possible machines you might need to use. Make a similar table on word, fill it out like the example shown and paste it into the space below.
activity 5: what's already out there
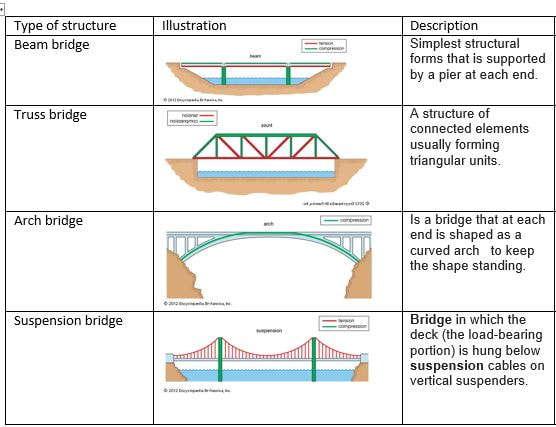
Open the following Internet site
http://www.pbs.org/wgbh/buildingbig/bridge/index.html
Check out the information on bridges, make a similar table, fill in and paste below.
http://www.pbs.org/wgbh/buildingbig/bridge/index.html
Check out the information on bridges, make a similar table, fill in and paste below.
Activity 6: cargo bridge game

Check out the bridge challenge on the web site http://limexgames.com/studio/games/cargo_bridge
1. What information have you gained about bridges by attempting the challenge?
2. What did you find difficult about the bridge building game?
3. What did you find east about the bridge building game?
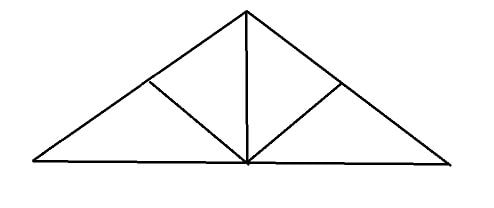
4. Sketch a bridge that you created on Cargo Bridge in the space below
1. What information have you gained about bridges by attempting the challenge?
2. What did you find difficult about the bridge building game?
3. What did you find east about the bridge building game?
4. Sketch a bridge that you created on Cargo Bridge in the space below

|

|
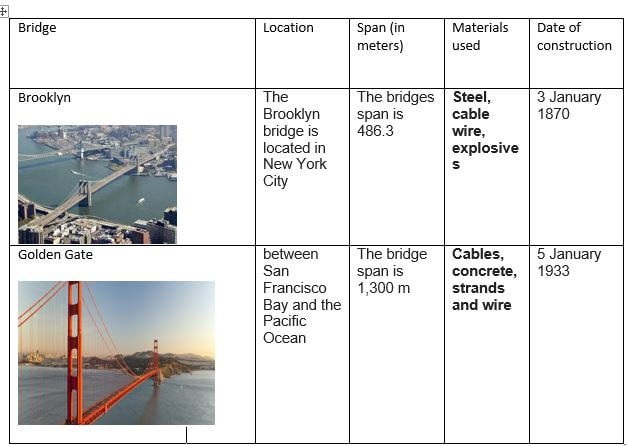
Activity 7
Complete this table on word, by researching the following bridges and paste it in below
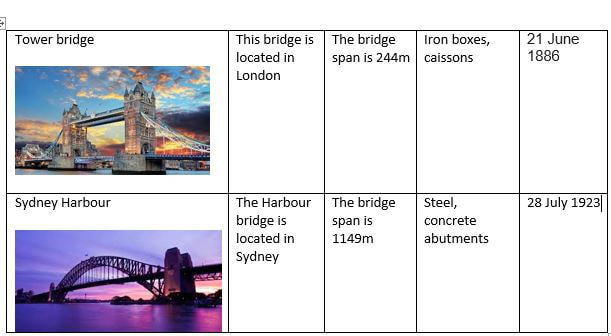

In the spaces provided, draw up your design ideas of how you would create your bridge. Write one positive things about your bridge, one negative and one interesting point.
Final design Now that you have researched bridges, sketched your ideas and looked at the positives, minuses and interesting points of each design, it is time to choose a FINAL DESIGN. This is the design that you are going to create in the workshops. Refer to your previous research on types of bridges, forces and your initial sketches.
You will need to draw your FINAL DESIGN on a big sketch paper and use that as a guideline to build your bridge.
Idea 1:
P: Very simple and easy to make
M: Not enough support so it can break
I: Creative
P: Very simple and easy to make
M: Not enough support so it can break
I: Creative

Idea 2:
P: It is a really simple design
M: Have lack of multiple support and are really expensive
I:
P: It is a really simple design
M: Have lack of multiple support and are really expensive
I:
Evaluation
In order to evaluate how successful we were in meeting our design brief and solving the problem we must perform testing.
Testing
Testing will take place in Week 9 in class
The bridge will be tested for its ability to bear a weighted load.
In order to evaluate how successful we were in meeting our design brief and solving the problem we must perform testing.
Testing
Testing will take place in Week 9 in class
The bridge will be tested for its ability to bear a weighted load.
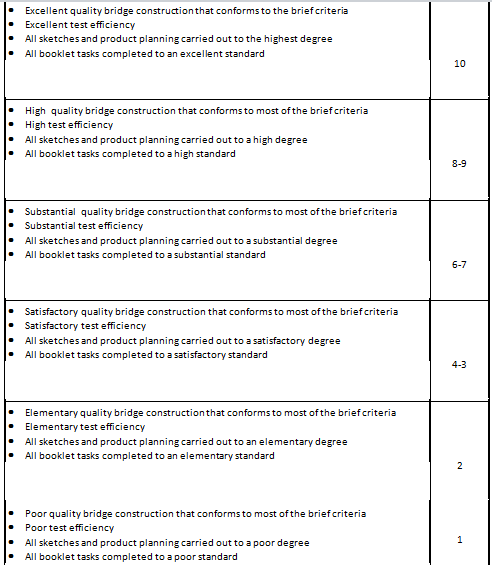
Marking criteria
Self evaluation
You also need to evaluate yourself and how you feel you progressed through this design challenge.
1. How well did my bridge do during testing? How much weight did it hold?
2. What was the best weight in the class?
3. What improvements could I have made to my bridge to make it better?
4. How did the problem/brief influence my type of design?
5. What changes did I make during the manufacturing process?
6. How did my research influence my bridge design?
7. What have I learned from this process of designing bridges?
8. What other bridges did I like and why?
